Chapter 1
A Logical Approach to Transmission Diagnosis
|
|
Chapter 1 A Logical Approach to Transmission Diagnosis |
The key to any successful diagnosis is to perform a logical series of checks, designed to identify the specific failure as quickly and accurately as possible.
This isn't some new concept, though it may be the first time you've seen it in print. In fact, chances are you've been using a logical diagnostic procedure for years...even if you've never looked at it that way.
For example, when a vehicle comes into your shop with a transmission problem, you probably start your diagnosis by performing a visual inspection, to look for anything obvious that could be wrong with the unit. Next, you check the fluid level and condition. Then you move on to a basic road test, to compare your observations with the customer's complaint.
All of these steps are part of a logical diagnostic procedure, with one simple goal: diagnosing the transmission.
Just because today's transmissions are controlled electronically doesn't change the need for a logical diagnostic procedure. And the place to start isn't any different from where you started before. A visual inspection...checking the fluidģa basic road test...all good beginning checks for any transmission - electronic or not. And, if you find a problem during these checks, fix it and recheck the transmission's operation. In some cases, that may be all that's necessary to repair the problem.
Most of the time, however, you'll have to go on to the next step in the diagnosis. This is where the procedure differs from checking a hydraulically-controlled unit. Because the next few steps enable you to determine whether the problem you're looking for is in the computer system, or in the transmission itself.
Inside or Outside?
This is one of the key questions in diagnosing computer-controlled transmissions: Is the problem inside the transmission, or in the electronic controls, outside the transmission?
If the problem's inside the transmission, in most cases you'll have to pull it out of the car and repair it. But very often, the problem may be in the electronics that control transmission operation, rather than inside the transmission itself.
So, isolating the transmission problem depends on being able to answer the simple question, "inside or outside?"

Isolating the transmission problem depends on being able to answer the simple question, "inside or outside"?
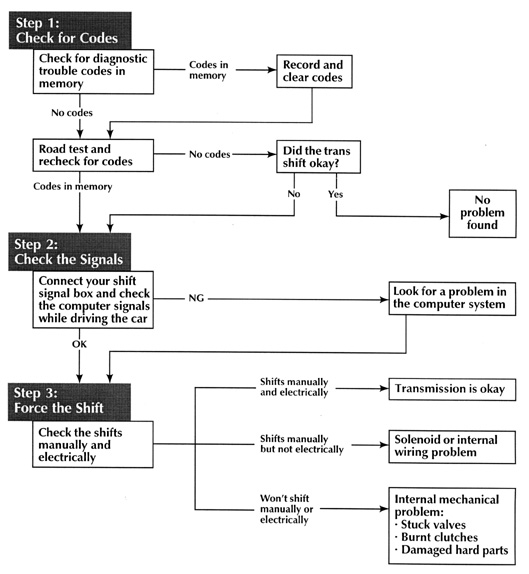
Sounds easy, doesn't it? And it is - in fact, the entire procedure for isolating the location of the problem can be summed up in these 3 easy steps:
Step 1: Check for codes.
Step 2: Check the signals.
Step 3: Force the shifts.
Let's take a look at each of these steps, and see what the results of each step indicate about the transmission and computer system.
Diagnostic Flowchart
This chart provides a basic diagnostic path to follow when diagnosing nearly any computer-controlled transmission. We'll take a look at how to perform each step, and see what the results of each step indicates.
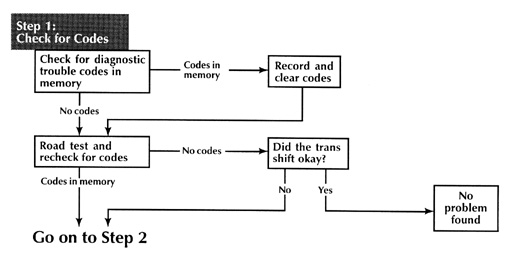
STEP 1: Read the Codes
The more complex any computer system is, the more help it usually provides for diagnosis. This is a basic tenet of computer systems, and automotive computers are no exception. Most automotive computer systems provide a series of diagnostic trouble codes (DTC) to indicate likely sources of problems.
The computer indicates these codes by flashing a malfunction indicator lamp, or MIL. On earlier vehicles, this light may bear the name "Check Engine," "Service Engine Soon," or "Power Loss"; but regardless of the label, they all provide the computer system with a means of communicating systems failures.
So the first step in any electronic transmission diagnosis is to read the diagnostic trouble codes. And not just read the codes: Record any codes you find, clear the codes and road test the vehicle. Then, after your road test, check the codes again, to see if any of the earlier codes are back, or if any new codes set.
The reason to clear the codes is because some codes in memory can actually affect transmission operation. More than one transmission problem has been fixed simply by clearing the codes from memory.
![]() Never disconnect the battery to clear the codes from memory. Disconnecting the battery will clear more than diagnostic trouble codes: It also clears radio presets, antitheft codes, electric seat memories and so on. Always follow the procedures outlined in the vehicle-specific section for clearing the codes.
Never disconnect the battery to clear the codes from memory. Disconnecting the battery will clear more than diagnostic trouble codes: It also clears radio presets, antitheft codes, electric seat memories and so on. Always follow the procedures outlined in the vehicle-specific section for clearing the codes.
If the transmission seems to operate okay during your road test, and no codes reset in memory, the transmission and computer system may be fine. Any codes that were in memory earlier may have been a computer glitch, or they could have been in there from an earlier diagnosis. But keep a record of them, just in case they come back later. They could help you identify an intermittent failure.

The computer uses a malfunction indicator lamp, or MIL, to indicate diagnostic trouble codes.
Any codes that return are probably hard codes; that is, they're problems that are there now - you should be able to find them by performing some basic diagnostic troubleshooting. New codes are probably in the same class; check the circuits that the codes indicate as having a problem.
An important point to remember is that diagnostic trouble codes never indicate a specific component failure. Instead, these codes indicate a system or circuit failure, such as a "MAP sensor voltage high." Of course, this code could indicate a bad MAP sensor, but it could just as easily indicate a vacuum leak or a loose ground wire.
That's why nearly every diagnostic trouble code has a specific diagnostic procedure associated with it. The procedure takes you through a series of checks, to help you isolate the specific failure that caused the code to set. Look for these procedures in your shop manual. Never replace any component based strictly on a diagnostic trouble code.
If you find a code in the computer's memory after your road test, record it, and then go on to the next step in the diagnostic procedure. Don't try repairing the problem until after your diagnosis is complete.
STEP 2: Checking the Signals
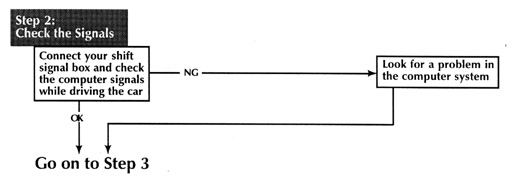
To control transmission operation, the computer develops a series of electrical signals. These signals energize and de-energize solenoids inside the transmission, which control fluid flow to operate the transmission.
So one of the best ways of determining whether you're looking at a transmission or computer problem is to examine the actual signals from the computer to the transmission. If the shift pattern doesn't match the transmission operation, the problem's in the transmission. If the signals aren't right for driving conditions, you know to look for a computer system problem.
Checking those signals is fairly simple, using a signal tester you can build yourself, for a few dollars' worth of parts, available at any electronics store. Look for the instructions to build your signal monitor later in this program.

One easy way to check the computer signals to the transmission is with a signal monitor you can build yourself.
Once you have your signal monitor built, connecting it to the transmission harness is a snap. From there, checking the shift signals is a simple matter of comparing the LEDs to the shift pattern chart in this book. If the pattern's wrong, you're looking at a computer system problem. If the signals are right, but the shift pattern isn't, you're probably dealing with an internal transmission problem. One more check will confirm the problemģ
STEP 3: Force the Shift

So far you've established that a computer system failure should set a code in memory. And if the signals to the transmission are okay, any shift problems have to be caused by a problem inside the transmission. So why would you need to force the shift?
Suppose the computer isn't providing the right signals to operate the transmission - you know you're faced with a computer problem. But what about the transmissionģ is it okay, or could it still have an internal problem? Of course there could still be an internal problem. So, before you assume that the only problem is in the computer system, your best bet is to check the transmission, by forcing the shift.

Forcing the shift manually involves disconnecting the transmission connector,
and operating the transmission different ranges manually.
There are two ways to force the shift: mechanically and electrically. Forcing the shift mechanically involves operating the manual shift lever with the transmission connector disconnected, and seeing how the transmission responds.
Disconnecting the connector puts the transmission into failsafe operation. In this mode, the transmission should provide specific gear ranges in each selector position. Each individual section includes a chart, showing what gear you can expect in each selector range.
Next, try forcing the shift electrically. This requires energizing and de-energizing the transmission solenoids in a specific order, to provide the same signals the computer would deliver to shift the transmission. Each section in this book provides a specific method for energizing the solenoids, to force the transmission to shift gears.

Each section in this book provides the specific steps
necessary to force the transmission to shift.
Put the car on a lift, and connect a set of jumper wires as shown in the section for the transmission you're working on. Shifting gears is a simple matter of connecting or disconnecting one of the wires: Each time you connect or disconnect a wire, the transmission should shift gears.
![]() Always use a fused jumper wire to provide power to the transmission connector. This prevents shorted components or harnesses from burning when you connect the jumpers. And always disconnect the harness from the computer system before attempting to energize the circuit. This prevents power from feeding back and damaging the computer system.
Always use a fused jumper wire to provide power to the transmission connector. This prevents shorted components or harnesses from burning when you connect the jumpers. And always disconnect the harness from the computer system before attempting to energize the circuit. This prevents power from feeding back and damaging the computer system.
There are three possible situations you could run into during the mechanical checks:
Ģ The transmission shifts manually and electrically
Ģ The transmission shift manually but not electrically
Ģ The transmission won't shift manually or electrically
If the transmission shifts manually and electrically, the transmission itself is probably fine. Any problems will usually be in the computer system or the wiring to the transmission connector. Use the diagnostic trouble codes to track down the source of the failure.
![]() The only exceptions to this are intermittent problems, such as a sticking shift valve; for those problems, you'll have to concentrate on the transmission signals when the problem actually occurs. If the signals are okay when the problem occurs, the failure is probably inside the transmission - even if it seems to shift okay manually and electrically.
The only exceptions to this are intermittent problems, such as a sticking shift valve; for those problems, you'll have to concentrate on the transmission signals when the problem actually occurs. If the signals are okay when the problem occurs, the failure is probably inside the transmission - even if it seems to shift okay manually and electrically.
If the transmission shifts manually but not electrically, there's probably a problem in the transmission solenoids or the harness inside the transmission. The transmission itself is probably okay. Once again, go back and check the codes to help identify the source of the problem.
But if the transmission won't shift manually or electrically, chances are you're faced with an internal transmission problem - burnt clutches, a hard parts failure, sticking valves - that sort of thing. Your next step will probably involve pulling the transmission out of the car. But don't forget about the computer system: More than one vehicle has come into a shop with both a transmission failure and a computer problem. And, very often, a computer failure can actually cause the transmission problem. So it's important to identify both problems before going on in your repair.
High Pressure Masks Transmission Problems
So if the transmission shifts when you energize the solenoids, the problem's in the computer system, not the transmission, right?
Well, maybeģ and then again, maybe not.
If the only electronic devices inside the transmission are the shift solenoids that control its operation, then yes, energizing the solenoids is a legitimate way to prove whether the problem's in the computer system. And in some electronic transmissions, the only electronic controls are the shift solenoids.
But these days, many electronic units contain a lot more than the shift solenoids. To begin with, many units keep an eye on transmission fluid temperature by including a thermistor in the circuit. A thermistor varies resistance with temperature changes; if fluid temperature rises too high, the computer adjusts the shift pattern and lockup to help lower the temperature.
Another type of sensor many transmissions include are pulse generators. These sensors develop a frequency signal that enables the computer to compare output shaft speed to either input shaft or sun shell speed. The computer uses this information to modify clutch apply timing, and to identify clutch slip.

A failure that affects the signals from the pulse generators can affect transmission operation,
but the transmission may still shift when you force the shifts.
Any kind of failure that affects these sensor signals could put the computer system into failsafe operation. Energizing the solenoids may allow the transmission to shift, but the problem that put the system into failsafe - a slipping clutch, incorrect gear ratio or sensor failure, to name just a few possibilities - is still there, inside the transmission.
Another consideration that could affect how the transmission shifts is line pressure. Many transmissions control mainline pressure through an electronic pressure control solenoid, or EPC. The computer may control this solenoid with a pulsed, variable duty cycle signal, or by varying the current flow through the circuit.
These solenoids are always designed to push pressures to maximum if power shuts down. This prevents the transmission from being damaged due to low pressures if the system goes into failsafe.
But it also causes a diagnostic challenge: Since you have to disconnect the computer harness to force the unit to shift electrically, line pressure will be higher than normal during these tests. This high line pressure can mask a slipping clutch or a slight leak in an apply circuit.
The transmission may seem to shift fine - but only while pressures are excessively high. Once the computer takes control of transmission operation, the pressures return to normal, and the problem returns with it.
So how can you find this elusive failure? Check the codes. Any failure profound enough to put the system into failsafe should be severe enough to set a diagnostic trouble code in memory. That code should direct you right toward the failure.
The important point to remember is that no one check will always enable you to isolate every transmission failure. That's why it's important to perform all three steps, and evaluate the results of each step, individually and as a whole. This combination will provide the most consistently accurate diagnoses, time and time again.
PAGE 7-17

