Chapter 4
Ford's Diagnostic
Trouble Codes
|
|
|
Retrieving the Codes
What’s more, many Fords don’t provide a malfunction indicator lamp to flash out the codes. Very often you have to use an analog voltmeter or some other type of device to read the codes.
Finally, later model Fords use three-digit codes; counting the flashes or voltmeter needle sweeps for code "675" (transmission range sensor voltage out of range) can become awkward at best.

Using a meter to read code 12 isn't too bad, but code 675 could offer a bit of a problem.
But if a scan tool isn’t available, you can read Ford diagnostic trouble codes without one, using the malfunction indicator lamp (if there is one) or a voltmeter.
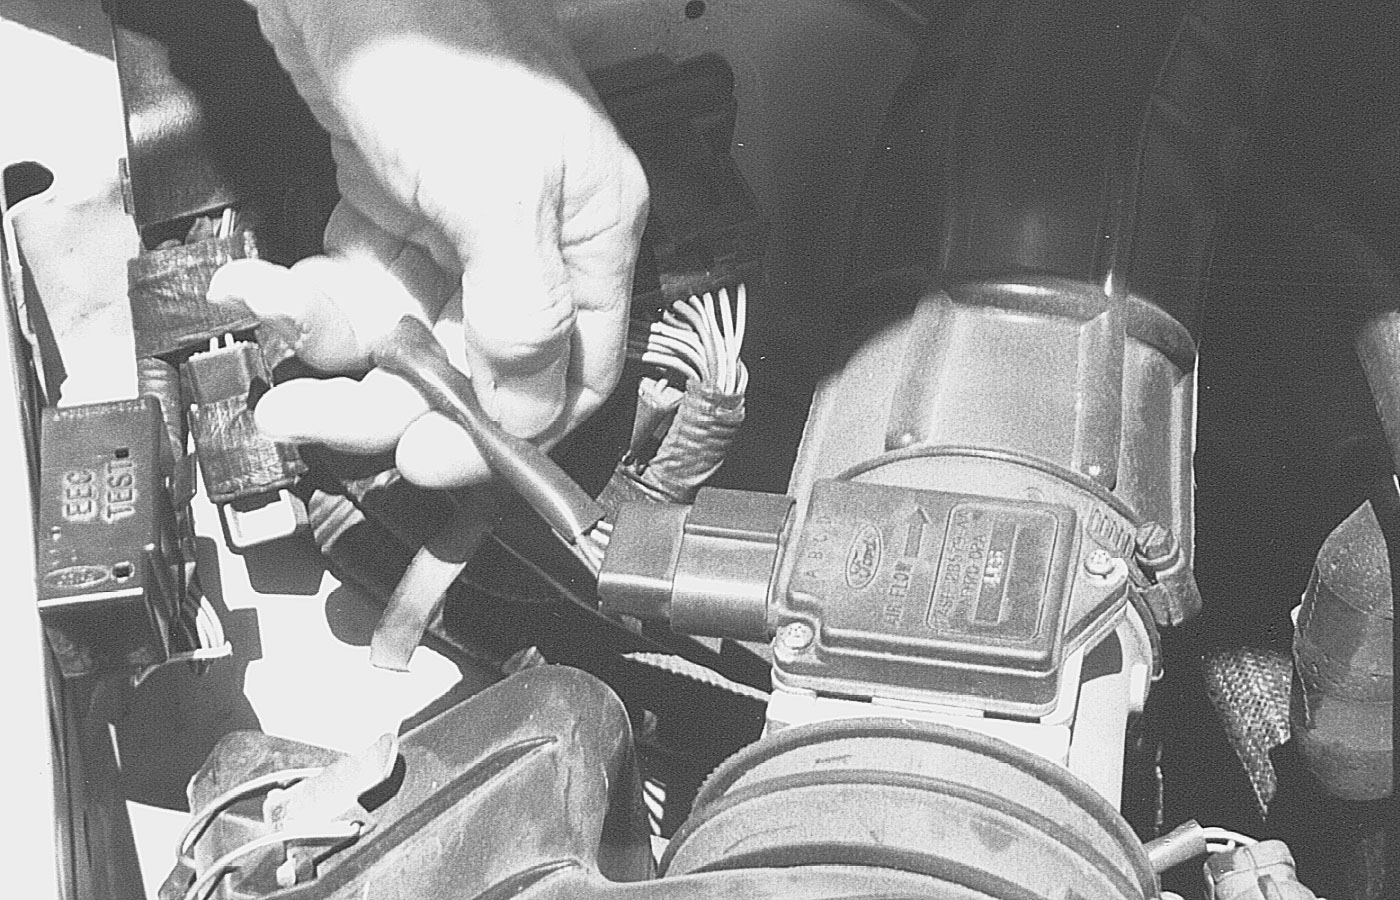
Start by locating the self test connector: It’s usually around a shock tower or near the firewall.
The self test connector is actually two connectors: a main connector and a separate pigtail connector. Here’s how to identify the individual terminals:

The self test input lets you tell the computer to display the codes; the self test output lets you read them.
With the key off, ground the self test input connector—that’s the separate pigtail connector. If the car has a malfunction indicator lamp, that’s all you have to do—turn the key on, engine off, and the lamp will start flashing codes.
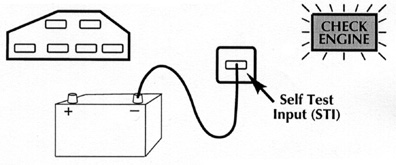
Grounding the self test input terminal puts the computer system into self test mode.
If the vehicle has a malfunction indicator lamp, it'll provide diagnostic trouble codes.
But if there’s no malfunction indicator lamp in the car, you’ll need to use something to read the codes. Ford recommends an analog voltmeter for this, but you can use almost anything that displays voltage changes: A digital oscilloscope, test light, or even a beeper will all work to display the codes. We’ll use a voltmeter, but feel free to substitute.
Connect the negative lead of your voltmeter to the self test output terminal. Connect the positive lead to any 12-volt source, such as the positive battery terminal.
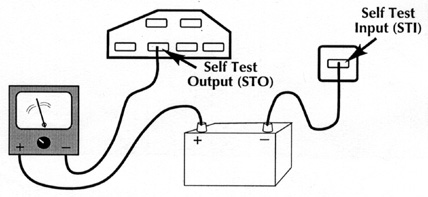
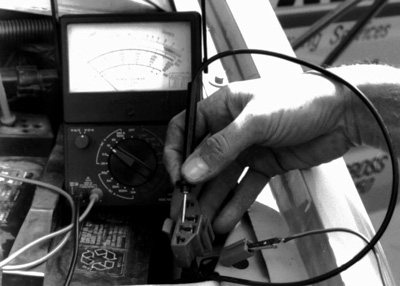
If the car doesn't have a malfunction indicator lamp,
you can read the diagnostic trouble codes with an analog voltmenter.
Counting the Codes
The time between the flashes or needle sweeps lets you determine whether it’s part of the same digit, a different digit, or a different code. Here’s how to identify the difference:
• There’s a 1/2-second separation between flashes or sweeps in a digit.
• There’s a 2-second separation between digits.
• There’s a 4-second separation between codes.
So here’s how a series of codes will appear:
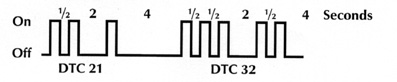
Here's how to read the codes, base on the on-time and the off-time.
Reading the Codes
• KOEO On-Demand
• KOEO Continuous Memory
• KOER On-Demand
Here’s how to read each code:
![]() On vehicles with diesel engines, you must hold the accelerator pedal to the floor during the KOEO On-Demand and Continuous Memory tests.
On vehicles with diesel engines, you must hold the accelerator pedal to the floor during the KOEO On-Demand and Continuous Memory tests.
KOEO On-Demand Codes: These are the first codes the computer displays during a self test. KOEO On-Demand codes aren’t stored in memory; the computer runs through a quick series of checks, and indicates any problems it recognizes at that moment. If the problem isn’t there right now, it won’t show up during this series. Any codes that display during this series indicate hard faults.
If doesn’t recognize any faults in the system, the computer displays code 11 (or 111 on systems with three-digit codes). This is also called "Pass 11" (or "Pass 111"); it indicates no hard faults in the system.
Separator Code: In between the KOEO On-Demand codes and the KOEO Continuous Memory codes, the system displays a code 10. This appears as a single flash (or sweep), since the computer can’t display a zero. Code 10 tells you there are no more KOEO On-Demand codes in memory, and it’s time to move on to the KOEO Continuous Memory codes. There’s a 6 – 9 second pause before and after separator code 10.
KOEO Continuous Memory Codes: These are the next series of codes; they’re the codes the computer has stored in memory. While they may indicate a problem that’s there now, they may also indicate intermittent failures, or a failure that only appears when the engine’s running, such as a vacuum leak.
If there are no codes in memory, the computer again displays a "Pass 11" (or "Pass 111") code.
![]() If you’re using a scan tool, you may have to wait up to 15 seconds for the system to display its Continuous memory codes. Give it time: If you disconnect the scan tool before it’s finished displaying the codes, the system will erase the codes before you have a chance to read them.
If you’re using a scan tool, you may have to wait up to 15 seconds for the system to display its Continuous memory codes. Give it time: If you disconnect the scan tool before it’s finished displaying the codes, the system will erase the codes before you have a chance to read them.
KOER On-Demand Codes: Once you’ve read the KOEO On-Demand and Continuous Memory codes, your next step is to check for problems that only show up while the engine’s running. These problems appear as KOER On-Demand codes. Since they’re on-demand codes, they don’t store in memory. And they indicate problems that only show up when the engine’s running.
For example, a vacuum leak to the MAP sensor may affect transmission operation, but it won’t show up during the Continuous Memory codes. And since there’s no vacuum when the engine’s off, it won’t show up during the KOEO self test either.
There are three types of codes Fords provide:
KOEO On-Demand Codes, KOEO Continuous Memory Codes, and KOER On-Demand Codes.
Here’s how to check the KOER On-Demand Codes:
• Disconnect the ground wire from the self test input wire.
• Make sure the transmission’s in park; set the emergency brake and block the drive wheels.
• Start the engine, and let it reach normal operating temperature.
• Shut the engine off.
• Ground the self test input wire again. If you were using a voltmeter to display codes, make sure it’s connected.
• Restart the engine.
Here’s what you’ll see:
Engine ID Code: The first thing the computer will do is to send the Engine ID code. This code should be a series of pulses, equal to half the number of cylinders in the engine. So a four cylinder engine will receive two pulses, a six cylinder receives three pulses, and an eight cylinder receive four pulses.
Technician Intervention
• Turn the steering wheel at least 1/2 turn…
• Press the brake pedal, and…
• Cycle the transmission control switch on and off (if equipped).
Now there will be a long pause — maybe as long as 20 seconds.
Dynamic Response Test: At this point, some systems will require a Dynamic Response Test. The computer examines the sensor response when you goose the throttle.
Watch for a single pulse: That’s dynamic response code 10. If you see this single pulse, goose the throttle quickly, all the way to the floor, and release it.
Some systems won’t require a dynamic response test. They’ll skip ahead to the next step.
Now the needle on your voltmeter may wiggle a bit. That’s the computer sending its fast codes; these are the codes a scan tool would read. Ignore them.
Six seconds after the computer delivers its fast codes, it begins pulsing out the KOER On-Demand Codes. Remember, these are the codes that won’t remain in memory; any problem that only shows up while the engine is running should appear in these codes.
If the computer doesn’t identify any problems, it’ll display a Pass 11 code.
Computed Timing Test: You can stop here, but at this point the computer fixes the timing at about 20° before top dead center. This allows you to check the timing, to make sure the computer is controlling it properly.
Power Balance Test: Finally, on vehicles with sequential fuel injection, the system goes into a power balance test. This enables the computer to identify weak cylinders in the engine.
To end this test mode, shut the key off and disconnect the ground lead to the self test input terminal.
The Wiggle Test
Not Ford. Most Fords have dozens of connectors, with short pieces of harness between them. This enables Ford to use the same harness for many different cars and trucks. But it also presents the possibility of a loose connection causing a computer system problem.
That’s why Ford builds a special test mode into their computer systems: the wiggle test. The procedure is simple: You put the computer into a special mode, where it looks for momentary glitches, and then wiggle the harness, shake the connectors, tap on sensors and switches. You can even apply heat to components, to see if they have a problem after they get hot.
Ford's wiggle test helps identify loose connections or intermittent failures in components or circuits.
KOEO Wiggle Test
• Erase any codes in memory.
• Turn the key off.
• If you’re using a voltmeter to read the codes, connect it to the self test output terminal and battery positive, the same way you did to read the codes. If you’re using the malfunction indicator lamp, skip to the next step.
• Turn the key on, engine off.
• Ground, unground, and ground the self test input terminal again (Ford calls this "latch" and "unlatch"). This puts the system into the wiggle test mode.

Ground, unground and ground the self test input terminal again to put the system into the wiggle test mode.
Now work your way around the wiring harness, wiggling the wires and connectors. Tap gently on the sensors and outputs. If you suspect a temperature-related problem, apply heat to the components or connectors with a hair dryer or heat gun.
If the computer sees any problems during this test, the needle on your meter will wiggle slightly. That indicates the computer stored a code in memory. Go back and check the KOEO Continuous Memory codes.
KOER Wiggle Test
Here’s how to perform the KOER wiggle test:
• Erase any codes in memory.
• Turn the key off.
• If you’re using a voltmeter to read the codes, connect it to the self test output terminal and battery positive, the same way you did to read the codes. If you’re using the malfunction indicator lamp, skip to the next step.
• Start the engine.
• Ground, unground, and ground the self test input terminal again (Ford calls this "latch" and "unlatch"). This puts the system into the "engine running" wiggle test mode.
Now go for a drive; try to duplicate the conditions that cause the problem in the first place. Hard acceleration, quick deceleration, hard turns — whatever condition seemed to cause the problem. When the problem occurs, the needle on your meter should wiggle slightly; if the vehicle has a MIL, it’ll flash. Check the KOEO Continuous Memory codes to determine the source of the problem.
Output State Test
The output state test occurs right after the computer system finishes displaying the KOEO Continuous Memory codes. As soon as the Continuous Memory codes are finished, press the gas pedal to the floor and release it. That puts the system into the output state mode. Nearly all of the computer outputs should be energized — including the transmission shift solenoids.
Now you can check the circuits, to make sure they’re energized, and check the solenoids, to make sure they’re working. This is also a good time to think about Ohm’s Law: Volts ÷ Ohms = Amps. So if you know the solenoid resistance spec, you can determine whether the solenoid is okay by measuring its current draw.
For example, if the solenoid should have 10 ohms resistance, the formula would be:
12.6 ÷ 10 = 1.26
…so the solenoid should be drawing 1.26 amps of current. If the solenoid’s drawing much more than that, it’s probably shorted. If it’s drawing much less, it’s probably open.
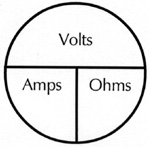
The output state test is a great time to put Ohm's Law to work.
As long as you know the resistance, you can check the component based on its current draw.
Press the gas pedal again, and the computer outputs turn off. You can turn the outputs on and off as many times as you want, to determine whether they’re working properly or not.
Clearing the Codes
PAGE 52-60